Some of our highest-value clients this year came from just two focused hours a week on LinkedIn Sales Navigator. This isn’t another “click here, type that” tutorial. Think of this as a hands-on, strategic guide to how seasoned operators use Sales Navigator to find the right people, start meaningful conversations, and close deals faster.
According to Wpromote’s State of B2B Marketing Report, 89% of B2B marketers use LinkedIn for lead generation. What makes it stand out is that 62% say it actually delivers leads — more than twice the rate of the next-best social channel. In other words, LinkedIn isn’t just popular, it’s effective. If you’re serious about making it your #1 channel for B2B growth, go ahead and bookmark this.
Let’s begin with a quick overview of the tool itself.
What Is LinkedIn Sales Navigator?
LinkedIn Sales Navigator is a paid tool on LinkedIn that helps you find the right people and companies to connect with. It’s built for sales teams, recruiters, and business owners who need more than what standard LinkedIn searches can offer.
With features like advanced filters, personalized lead suggestions, and real-time updates, it enables you to build a stronger pipeline, track prospects effectively, and nurture valuable relationships.
Before You Touch the Tool: Mindset & Misconceptions
When many people start with Sales Navigator, they believe paying for the tool will somehow automatically generate leads.
The thinking often goes, “If I pay, I’ll get 2–3 leads automatically.”
In reality, that’s a wrong assumption.
LinkedIn Sales Navigator is simply a tool. The more advanced and expensive the tool, the more time it takes to master. If it truly produced leads on autopilot, everyone would be using it. The real results come when you combine it with a clear strategy, strong positioning, and the right workflows.
Clarify Your Positioning & Persona Stack
If you’re using Sales Navigator without clear positioning, that means you’re not generating leads, but simply collecting contacts. And this is where most marketers go wrong. They jump into filters before asking: Who are we really trying to reach? And more importantly: Who can help us reach them?
Use this 3-part Persona Stack to sharpen your targeting:
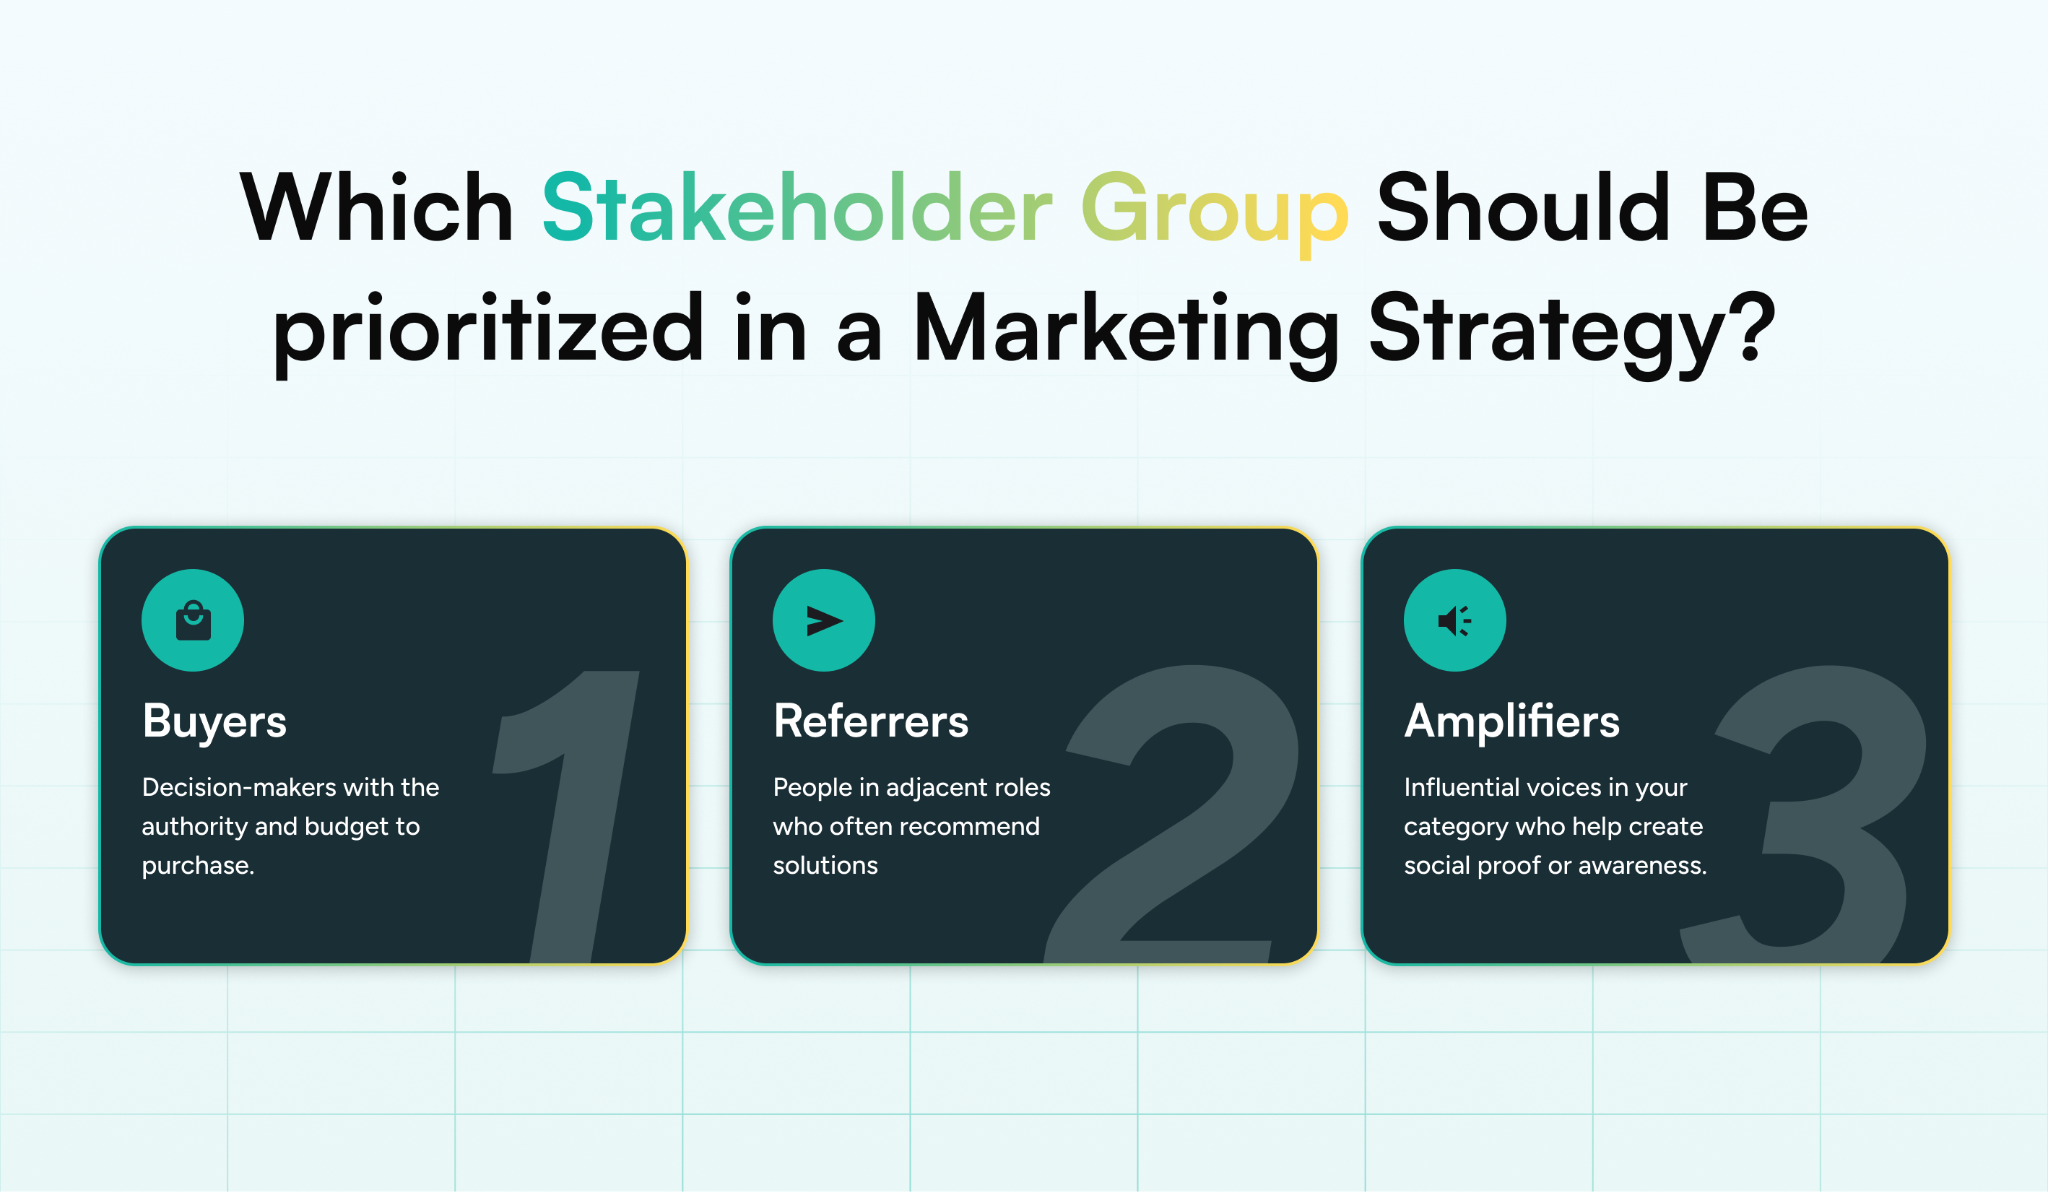
- Buyers: Decision-makers with the authority and budget to purchase.
- Referrers: People in adjacent roles who often recommend solutions like yours (e.g., consultants, advisors).
- Amplifiers: Influential voices in your category who can help create social proof or awareness.
Along with using filters, it’s important to be clear about where your company stands. Are you a challenger brand or the category leader? What pricing tier do you fall into: entry-level, mid-market, or enterprise? Also, think about what usually triggers someone to buy your product. It could be factors like team growth, new funding, or changes in your tech tools.
“LinkedIn Sales Navigator doesn’t give you good leads. It shows you what you ask for. Ask better.”
Pro tip: Referrers and Amplifiers often get overlooked, but they can open more doors than cold outreach ever will. Don’t skip them in your persona targeting.
Key LinkedIn Sales Navigator Features That Actually Matter (And How to Use Them Smartly)
Rather than using Sales Navigator like a spreadsheet (ticking boxes, stacking filters, etc.), you should focus on and combine a few high-impact filters to surface qualified, high-potential leads. Here’s what actually moves the needle for lead gen:
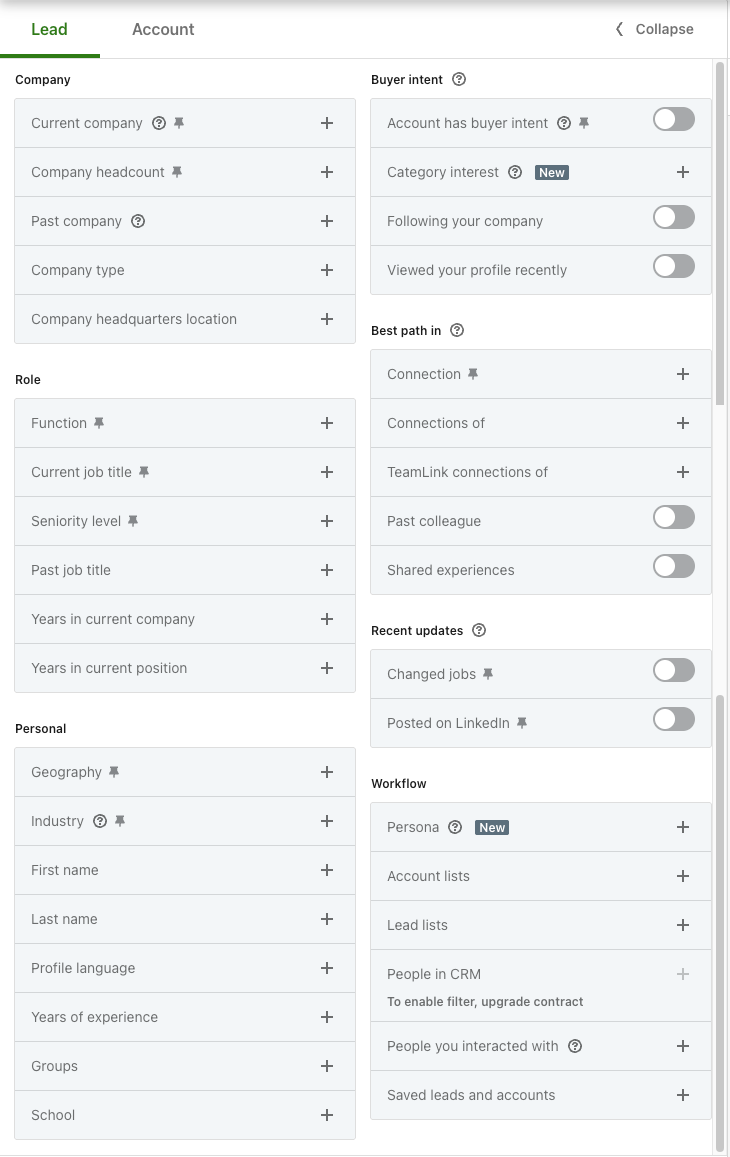
1. Advanced Filters → Build Laser-Targeted Personas
Instead of throwing in seven filters and hoping for relevance, combine two or three high-signal filters to carve out precise segments.
Pro combo: “Seniority level” + “Job title” + “Posted on LinkedIn in past 30 days” = active decision-makers, not dormant accounts.

This approach lets you build personas that match your ICP and are more likely to engage.
2. Spotlights → Shortlist “Likely to Respond” Leads

Spotlights highlight warm opportunities, like people who have recently changed jobs or follow your company. Use this to prioritize outreach to those already showing intent signals. These leads often convert faster because they’re in the process of transitioning or are already aware of your brand.
3. Saved Searches → Automate Pipeline Top-Up
With Saved Searches on Sales Navigator, you can lock in lead or account search filters and revisit them anytime to find fresh prospects that match your exact criteria.
Sales Navigator also sends weekly alerts when new leads or accounts fit your saved search, so you're always up to date with your target market. You can save up to 50 searches each for leads and accounts.
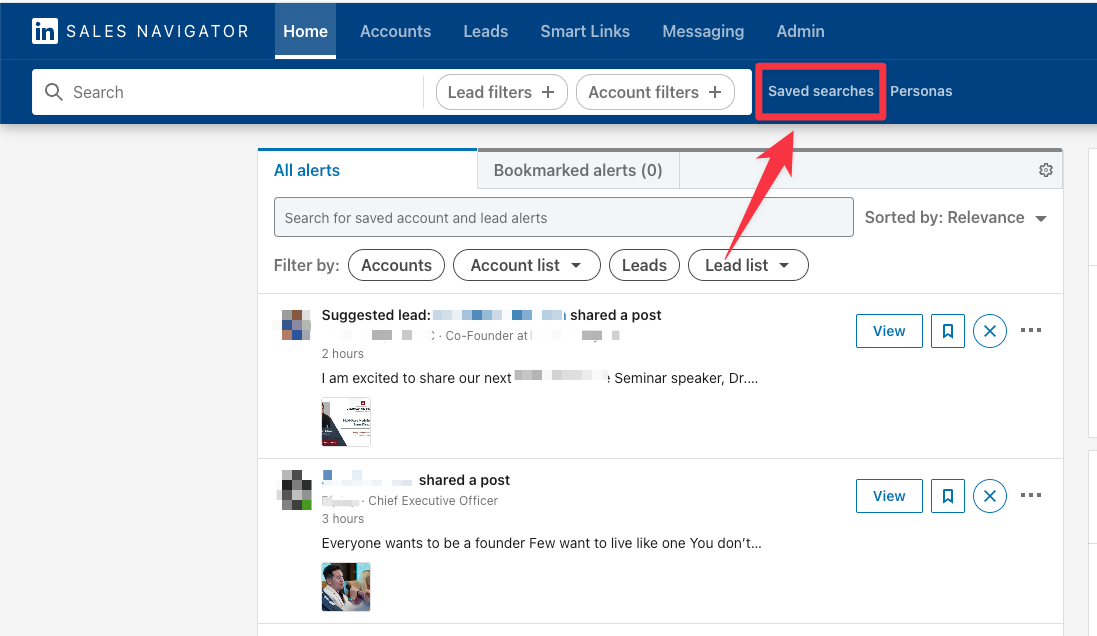
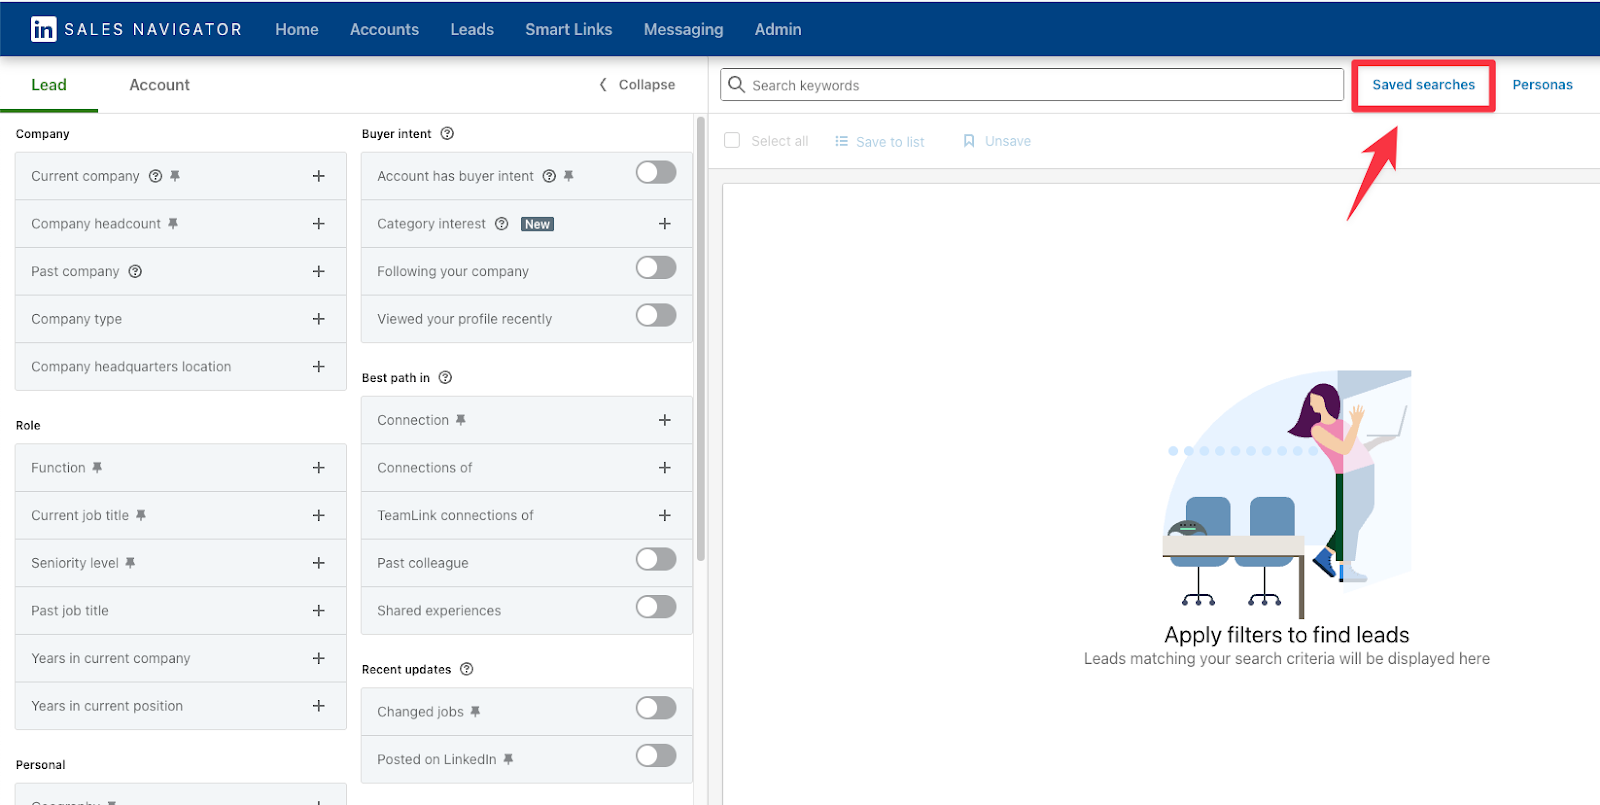
To access them, just click “Saved Searches” at the top right of your Sales Navigator homepage or through the lead/account search pages.
4. Account Search → Build ABM (Account-Based Marketing) Lists

If you’re targeting named accounts, use Account Search to filter companies by headcount, industry, revenue, and geography. Then drill down into each account to find multiple buying committee members who are ideal for multi-threading and ABM plays.
Pro tip: Account-level targeting should come before lead-level targeting.
- Build a list of target accounts based on revenue size, headcount, headquarters location, and whether they’re in the Fortune 500.
- Save those accounts in LinkedIn Sales Navigator.
- Then search for decision-makers (CEOs, CMOs, etc.) within those companies.
This ensures you’re only reaching relevant companies, with messaging tailored to their context.
Always start with company-level targeting, then move to people-level targeting.
5. CRM Sync → Align Data with Reps & Outreach Tools
Syncing Sales Navigator with your CRM, such as Pipedrive or Dynamics 365, ensures your reps don’t double-tap the same lead. It also lets your outreach sequences stay aligned with real-time profile changes, like when a lead changes jobs or gets promoted.
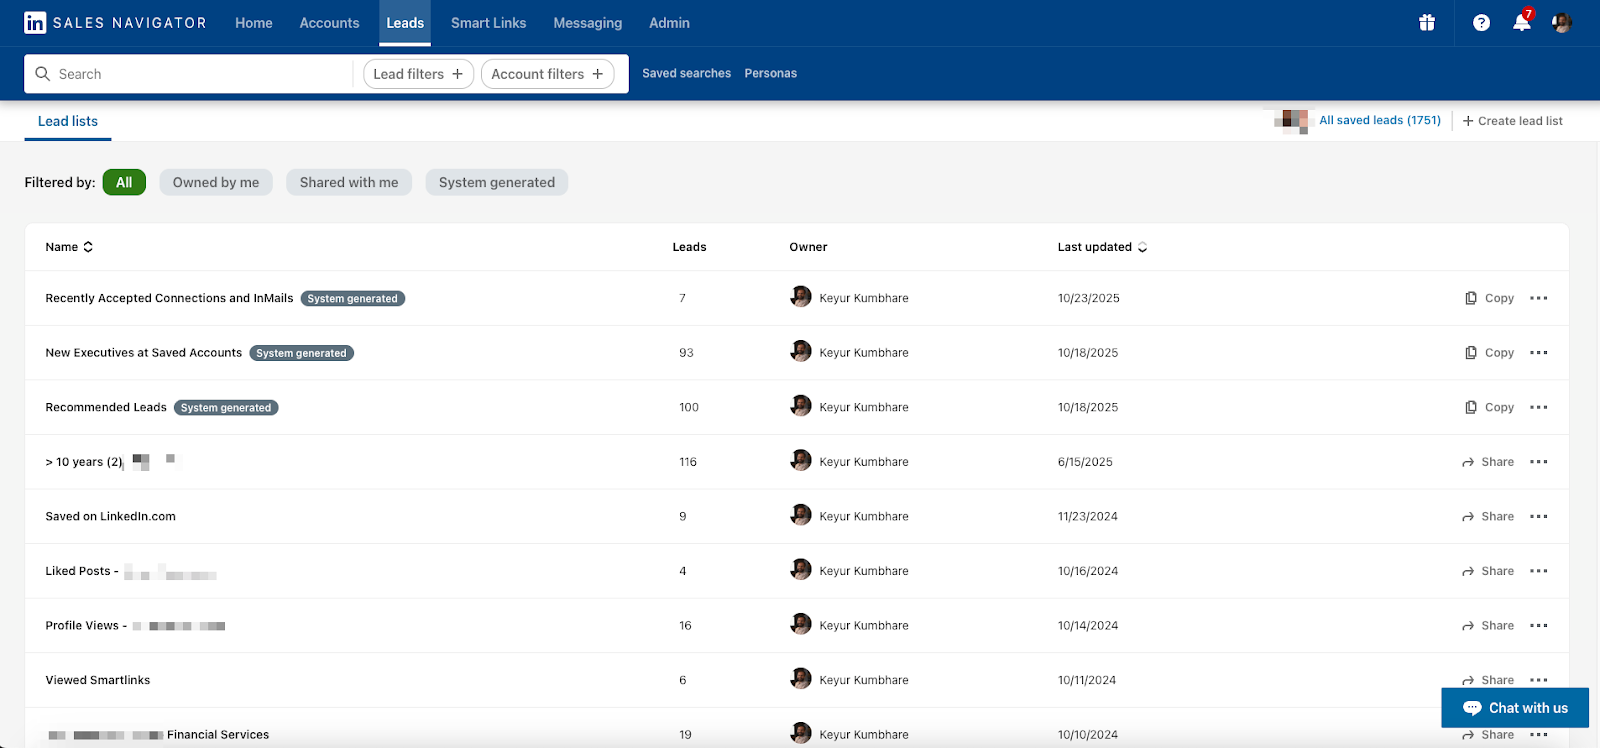
6. Lead Lists → Organize by Funnel Stage
Don’t keep all your leads in one bucket. Create custom lead lists by funnel stage: Top of funnel (cold), Mid (engaged), Bottom (ready). This lets you personalize outreach by stage, track progress, and hand off leads to sales at the right time.
Step-by-Step Prospecting Framework Using Sales Navigator
Here’s a framework seasoned B2B marketers and sales leaders rely on to consistently identify high-fit, high-intent leads, without spending hours on manual research.
Step 1: Use Advanced Search Filters to Build a Targeted Prospect List
When I first used Sales Navigator, I made the same mistake many people do. I went straight to lead filters, picked “CEO” as the title, added minimal targeting (India + one small filter like industry), and hit search.
Start by defining your Ideal Customer Profile (ICP) in detail: not just industry and job title, but also company size, funding stage, geographic focus, and tech stack (if applicable). You can use filters like:
- Company headcount (to prioritize scalability)
- Seniority level (to speak directly to decision-makers)
- Role + function (e.g., VP of Marketing vs. Marketing Manager — different pain points, different hooks)
- Geography (localize messaging or time outreach appropriately)
- Technology used (via integrations or 3rd party tools)
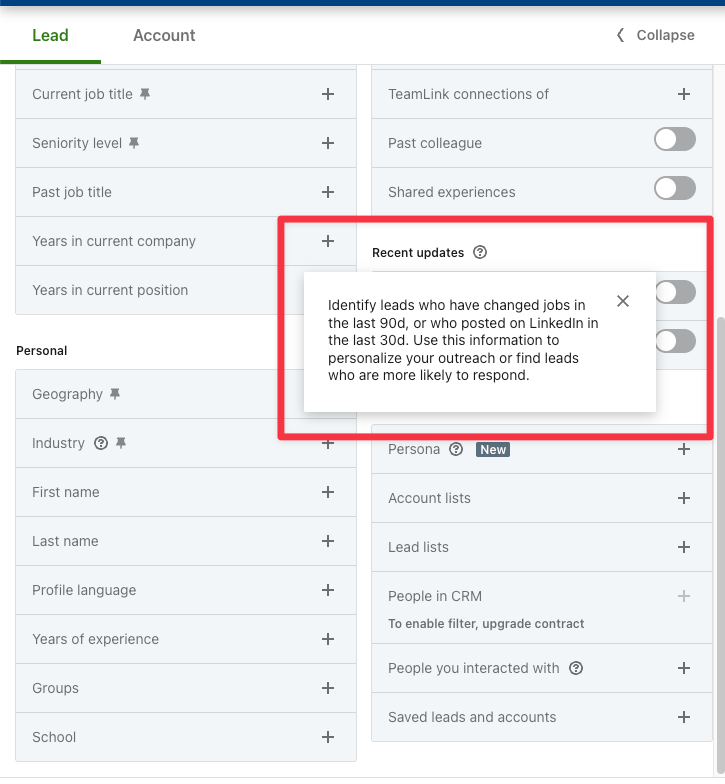
Next, layer in “Spotlight” filters, especially “Posted in the last 30 days” or “Changed jobs in the last 90 days.” These signal active users or those going through transitions, both of which are strong engagement triggers.
If you're targeting CMOs at US-based SaaS companies with 51–200 employees, for instance, this combo of firmographics + behavior signals helps you surface prospects who match your ICP and are also more likely to respond.
Step 2: Networking via Mutual Connections
One of Sales Navigator’s most underrated filters is “Connections of [specific person].”
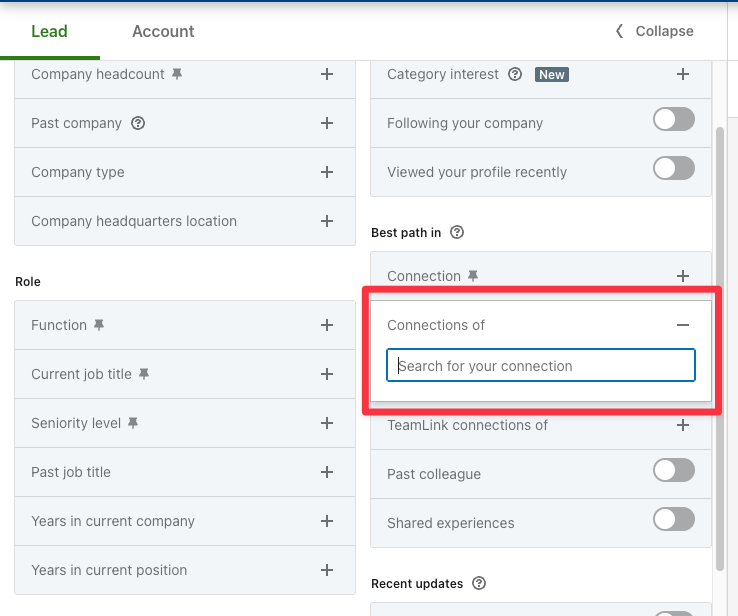
If you know someone who’s well-connected in your target market, search only their connections, then add filters like location and job title.
Let’s say:
You live in Delhi but plan to spend a week in Bangalore for business meetings. You want to meet the CEOs of tech companies in Bangalore. You realize your friend Rohit (based in Bangalore) already knows several CEOs in the city.
How You’d Use Sales Navigator:
Step 1: Open the “Connections of” Filter
- In Sales Navigator, go to “Connections of” and type Rohit’s name.
- Now, LinkedIn will only show Rohit’s connections in your search.
Step 2: Add More Filters
- Location: Bangalore
- Job Title: CEO / Founder / Managing Director
- Industry: Information Technology & Services (optional)
Step 3: See the Results
Instead of searching all of Bangalore, you might now see 40–50 CEOs who already know Rohit.
That’s a warm lead pool. You can open with:
“Hi [Name], I’ll be in Bangalore next week. Rohit and I have been working together for a while, and he mentioned you’re doing some amazing work in [industry]. Would love to meet for a quick coffee and explore potential ways to collaborate.”
You’re building on the trust Rohit has already established, which makes people more open to responding.
Pro tip: People often overlook the “School” filter in Sales Navigator. Targeting alumni from your own university (or one you have strong ties to) increases trust and boosts response rates.
Example: If you studied at Stanford, filter for Stanford alumni who are in your ICP. That shared background makes it easier to start a conversation without sounding salesy.
Step 3: Master Boolean Search for Precision
LinkedIn Sales Navigator’s filters are great, but if you want to go deeper and get more relevant results, Boolean search can be a great option. It’s a way to combine keywords using logic like AND, OR, NOT, quotes, and parentheses to narrow down exactly who you’re looking for.
You can use Boolean in two places on Sales Navigator:
- Global Keyword Search: Scans the entire profile (bio, skills, job history, etc.)
- Job Title Filter: Looks only at the current job title
5 Useful Boolean Operators:
- Quotes (" "): Search exact phrases (e.g., "Head of Marketing")
- AND: Include multiple conditions (e.g., Marketing AND SaaS)
- OR: Include at least one option (e.g., B2B OR Startup)
- NOT: Exclude terms (e.g., NOT Intern)
- Parentheses ( ): Group conditions (e.g., (Manager OR Director) AND SaaS)
Let’s say you want to find mid to senior-level marketers in B2B SaaS, but you don’t want to see results for interns or assistants.
You can search like this:
("VP of Growth" OR "Head of Marketing") AND (B2B OR SaaS) NOT (Intern OR Assistant)
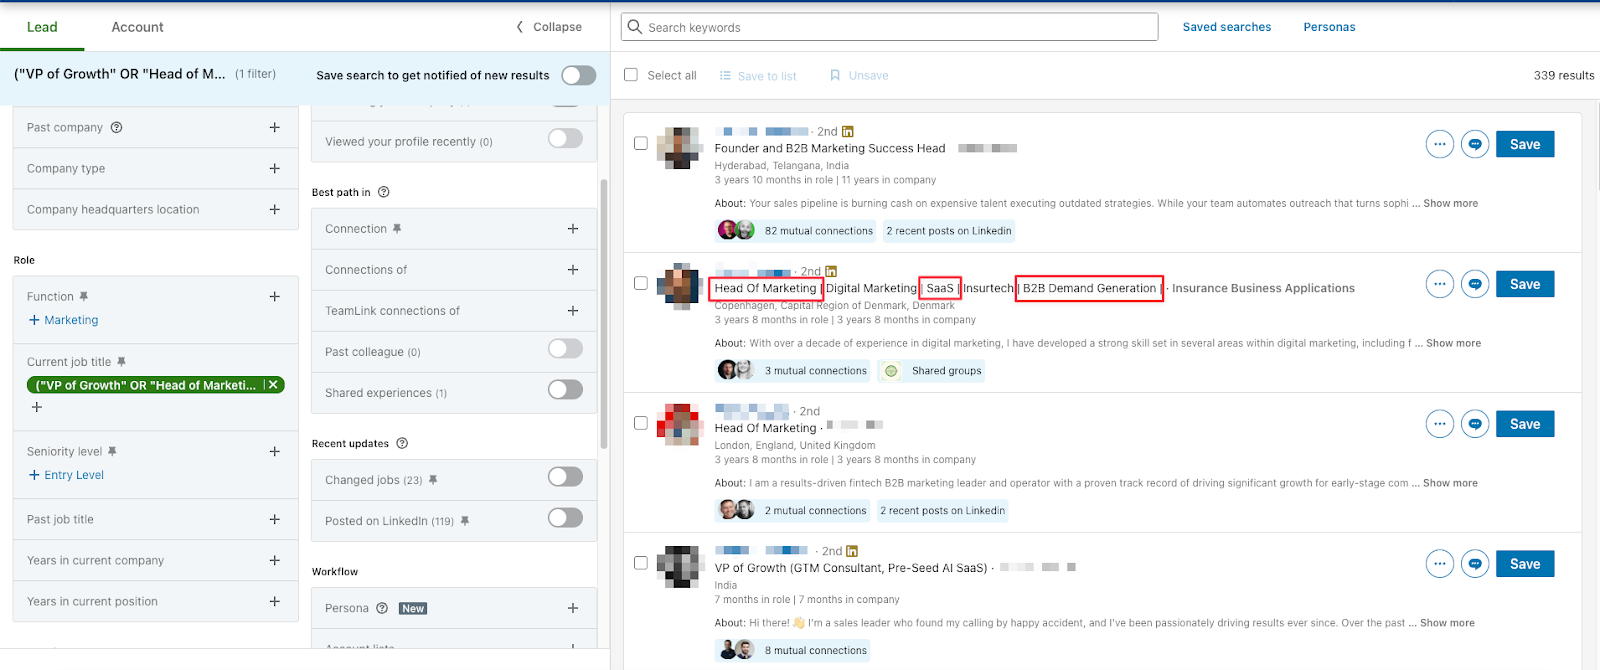
This kind of search gives you much better control than using dropdown filters alone. It allows you to target people with overlapping roles or hybrid job titles, uncover niche segments like “ex-Amazon PMs in Climate Tech,” and filter out irrelevant results such as consultants or junior-level roles.
Pro tip: Build a library of tested Boolean strings by persona. Over time, these become high-converting templates that save hours and outperform broad targeting.
Step 4: Save & Organize Leads Using Lead Lists
Once you’ve found potential prospects using Sales Navigator, the next step is to organize them using Lead Lists.
Lead Lists are built-in folders that let you save, group, and track prospects in one place. Instead of dropping everyone into one big list, segment them into Cold, Warm, and Hot lists based on engagement level, buyer intent signals, and deal stage.
You can also tag leads with labels like:
- Top Priority: Matches ICP + recent activity
- Needs Follow-Up: Replied, but went cold
- Engaged on Our Post: Specific action triggers
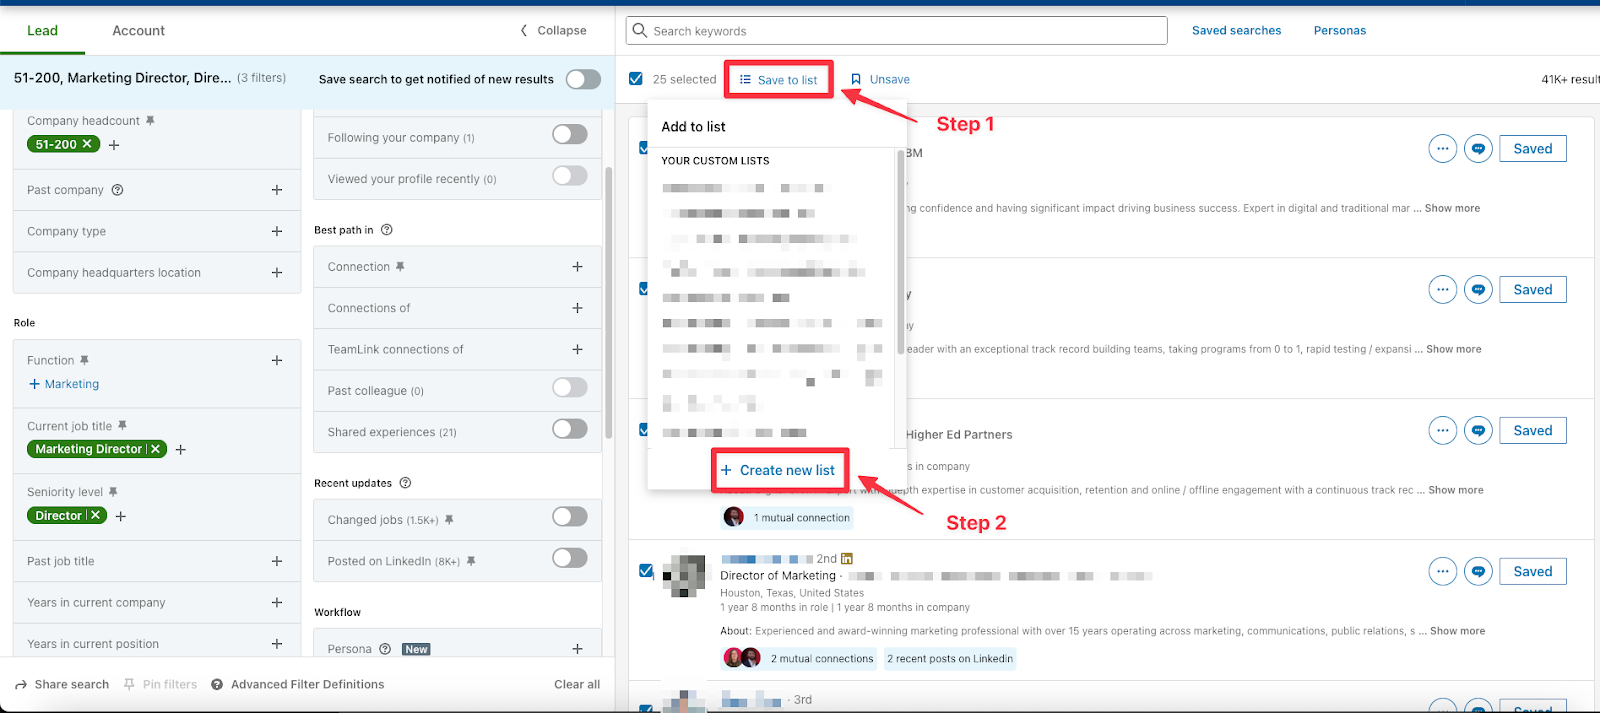
To save a lead in Sales Navigator, just click the “Save” button next to their profile. A pop-up will appear asking you to select or create a Lead List. You can name lists based on campaigns, industries, or deal stages. Once saved, go to the “Lead Lists” tab from the left-hand menu to view and manage your lists. From there, you can add tags, write quick notes, and even filter leads based on activity or account updates.
This kind of segmentation helps you know who to follow up with and when, and track pipeline progress without bouncing between tools. Sales Navigator also lets you monitor real-time updates for leads in your lists, like job changes, company moves, or new posts. These alerts give you perfect openings to reach out with context.
Step 5: Track Prospect Movement with Alerts & Triggers
Set alerts for high-signal events: job changes (especially into leadership roles), company funding news, team expansion, or even posts signaling pain points (“Looking for a new CRM,” “Scaling our outbound team,” etc.). Don’t just consider these as data points.
Here’s what seasoned operators do:
- Job changes: When someone you’ve previously pitched moves to a new company, reconnect as soon as possible. Decision-makers often bring in tools and partners they trust.
- Funding rounds or hiring spikes: These signal budget and urgency. Tailor your outreach around helping them scale or solve upcoming challenges.
- Engagement alerts: If a lead likes or comments on thought leadership in your niche, you’re already top-of-mind. Engage with value before pitching.
Set daily or weekly workflows to review these triggers and prioritize based on intent signals.
Rule of thumb: Follow up within 24 to 72 hours of the event. That’s when your message feels relevant, not random.
Step 6: Leverage Smart Links (Underused Feature in Advanced Plan)
Most LinkedIn Sales Navigator users don’t even explore the Smart Links feature because they assume content tracking requires expensive marketing automation tools. In reality, Smart Links is built right into your subscription and takes less than 5 minutes to set up.
Smart Links is one of the most powerful yet overlooked tools in LinkedIn Sales Navigator, available only in the Advanced and Advanced Plus plans. It allows you to share content, such as PDFs, case studies, product brochures, pitch decks, or presentations, through a single, branded link instead of bulky email attachments.
When your prospect clicks the Smart Link, they’re taken to a clean, professional viewing interface. The real value lies in the background insights, where you gain access to detailed analytics on:
- Who opened the link (even if you shared it in a group email).
- How long did they spend on each page of your content?
- Which sections or slides did they view the most (e.g., pricing, testimonials, product specs)?
This data is a direct signal of buying intent. For example, if a lead spends 20+ seconds on the pricing slide or reopens your proposal multiple times, you know they’re actively evaluating your offer. This insight lets you prioritize hot leads and follow up with precision instead of sending generic check-ins.
Pro tip: Use Smart Links for proposals, demo decks, or ROI calculators. Then, time your follow-up based on their engagement. Reaching out while the content is still fresh in their mind can significantly increase your chances of a positive response.
Step 7: Export Leads & Enrich Email Data
Once you’ve filtered your ideal leads using Sales Navigator’s advanced criteria, it’s time to extract that data for outreach. If you’re on the Advanced Plus plan, you can export directly.
But here’s where most marketers go wrong: they push raw data straight into CRMs. Always clean your list first by removing duplicates, invalid job titles, and incomplete profiles. It keeps your pipeline accurate and your sequences effective.
Tools like Wiza can help by exporting your Sales Navigator leads and enriching them with verified email addresses.
Pro Tip: Sales Navigator caps search results at 2,500. To get around this, break your search into chunks (e.g., by geography, industry, or seniority). It’s tedious, but worth it, and you’ll uncover leads your competitors miss.
Here’s a simple breakdown of how the export process works:
- Choose your method of export
If you’re on the Advanced Plus plan, you can export directly. Otherwise, you’ll need a Chrome extension that supports data extraction. - Install the extension
Add the extension to your browser. Once installed, it will connect automatically with your Sales Navigator account. - Search and select leads
Use Sales Navigator’s Advanced Search to apply filters based on job title, location, industry, etc. Create a lead list if you haven’t already. - Save and organize your leads
Click “Save” on each lead and add them to a new or existing list. You can manage, rename, or sort these lists anytime from the “Lead Lists” section. - Export the list to CSV
Open your lead list, activate the extension, and follow the steps to export the list into a CSV file. You can now clean and enrich this data before uploading it to your CRM.
Lastly, enrich emails using tools like Wiza, Dropcontact, Clearbit, or Hunter to get verified, work-based emails before launching outreach.
Quality enrichment = higher delivery rates and fewer bounced campaigns.
Step 8: Personalize & Send Messages That Start Conversations
Once you’ve identified high-fit prospects using filters and account lists, it’s time to make the first move, but don’t just spray and pray.
You must know that templates won’t get you replies, but context will. Start by checking the “Recent Activity” tab on a prospect’s profile. If they’ve posted, commented, or liked something recently, you have an instant in. Reference that activity to show relevance and intent.
For example:
“Caught your post on [Topic]. It was an insightful take. We've been helping similar teams with [Solution], would love to compare notes.”
Next, scan for Shared Connections and Shared Experiences such as schools, companies, or LinkedIn groups. These warm up cold intros and lower resistance. Even a simple line like:
“Noticed we’re both part of [Group] / went to [School]. It’s always great to connect with fellow [Alumni/Peers]”
Here, our goal is to make every message feel like it could only be sent to that person.
“Sales Navigator gives you the intel. The win is in how you use it.”
For connection requests, always send 1:1 personalized notes. A generic “Let’s connect” gets ignored or worse, flagged.
InMails are your power play. Use them strategically to bypass connection limits (you get 50/month in the Core plan), especially for senior decision-makers.
Here’s what works:
- Subject line: Ask a question or reference a pain point
- Body: Keep it under 500 characters
- CTA: Use soft CTAs like “Open to a quick chat next week?” instead of hard sells
You’ll find outbound copy frameworks in a section below to help you write effective messages.
Think of every message as an icebreaker, not a pitch. Your goal should be to start a conversation, not close a deal in the first message.
Step 9: Automate & Optimize with Saved Searches

Start by saving your highest-performing search queries (these are gold mines that consistently surface ICP-matching leads). Once saved, Sales Navigator will automatically notify you when new prospects fit your criteria. This ensures you're not just working with a static list, but constantly discovering fresh, relevant leads without lifting a finger.
Next, create a “Do Not Target” list. Add current clients, closed-lost opportunities, and even competitors here. It sharpens targeting, avoids awkward outreach, and keeps your team aligned.
Pro tip: Filter for Open Profiles wherever possible. These allow you to send free InMails, saving budget and boosting response rates, especially useful when scaling outreach across multiple accounts.
When done right, this step turns LinkedIn into a lead-generation engine that compounds week after week.
Outbound Copy Frameworks That Can Convert (Not Templates)
After a decade in outbound and B2B marketing, we’ve found these 3 copy frameworks consistently outperform generic templates. These are flexible mental models designed for LinkedIn Sales Navigator outreach.
Framework 1: Problem → Social Proof → CTA
This works well for mid-funnel ICPs already aware of the problem but not yet considering solutions.
Example Message:
"A lot of [job title]s I speak with are struggling to get clean pipeline data from Sales Navigator. We helped [SaaS company] cut manual list building by 40% using a custom search workflow inside Navigator. Want me to walk you through it?"
- Problem: “Struggling to get clean pipeline data”
- Social Proof: “We helped [SaaS company]…”
- CTA: “Want me to walk you through it?”
Framework 2: Trigger Event → Relevance → Ask
Perfect for leveraging Sales Navigator alerts like job changes, funding rounds, or company growth.
Example Message:
"Congrats on the Series A — big milestone! We work with post-funding SaaS teams to speed up outbound ramp time. Happy to share how [Client] got their first 30 demos in 21 days post-raise — worth a quick call?"
- Trigger Event: “Series A”
- Relevance: “We work with post-funding SaaS teams…”
- Ask: “Worth a quick call?”
Framework 3: Saw You [Activity] → Offer Value → CTA
This taps into mutual interests or LinkedIn activity, ideal for warm engagement.
Example Message:
"Saw your comment on the RevOps thread — totally agree, GTM teams need shared metrics. We built a dashboard template for that exact use case. Want me to send it over?"
- Saw Activity: “Comment on RevOps thread”
- Offer Value: “Dashboard template for that use case”
- CTA: “Want me to send it over?”
Pro Tip: Use LinkedIn Sales Navigator’s "Lead Lists" and "Custom Alerts" to track funding rounds, job changes, and new posts. Then plug those signals directly into these frameworks for context-rich messaging.
Common Mistakes Even Experienced Users Make
We’ve seen even seasoned marketers fall into traps that quietly kill their Sales Navigator performance. Here’s what to watch for:
Overfiltering Searches
It’s tempting to stack filters like Function, Seniority, and Technology, but too many filters shrink your results or return bad data. Why? LinkedIn’s profile tagging isn’t always current or accurate. A cleaner search with fewer constraints often surfaces better-fit leads.
Misusing the Keyword Filter
This one’s common. People use the keyword field to find titles, but it scans the entire profile, pulling random mentions. A content manager who once said “worked with sales engineers” may show up in your VP of Sales query. Use the Title filter instead.
Not Accounting for Multiple Current Roles
LinkedIn lets people hold multiple “current” positions. Many users forget to close out old jobs. When filters say “current company = X,” you might miss them. Always double-check profiles for multiple active roles.
Overrelying on the Industry Filter
Industry in Lead Search is based on what users select for their own profile, not their company’s actual industry. That means you could target "Marketing & Advertising" when they work at a SaaS company. Use Account Search > Industry instead when accuracy matters.
Ignoring Spotlights
Spotlights like “changed jobs in the last 90 days,” “posted on LinkedIn,” or “follow your company” are gold. These are warm leads. They’re active, open to change, and likely to respond. Ignoring them is like skipping the fast lane.
Sending Generic Messages
“Hi, I saw your profile — let’s connect” is the fastest way to the ignore pile. Personalize with context: mention a recent post, mutual connection, or something specific from their profile.
No Follow-Up System
One message isn’t outreach, it’s wishful thinking. If you don’t track who responded, follow up, or add leads to a CRM or nurture sequence, you’ll lose potential opportunities. Have a structured system to move leads through connection → conversation → call.
Conclusion
LinkedIn Sales Navigator is only as good as the strategy behind it. When you trust the filters too blindly, skip Spotlights, or treat outreach as a one-off message, you miss the point—and the pipeline. It’s not about doing more; it’s about doing it smarter. Avoid these pitfalls, and the tool becomes far more than a search engine; it becomes a repeatable system for predictable growth.
Treat every search, list, and message as part of a larger motion. The real wins come from precise targeting, sharp positioning, and a system that turns signals into conversations and conversations into deals.
If you want to go deeper into building a repeatable LinkedIn outreach strategy, book a quick discovery call with us to see how you can start filling your pipeline this month.
Disclaimer: All the prices mentioned in the content are subject to change. Kindly check LinkedIn for the most up-to-date info on pricing.
Frequently Asked Questions
What’s the difference between LinkedIn Premium and LinkedIn Sales Navigator?
While both are paid LinkedIn plans, Sales Navigator is built specifically for sales professionals. It offers advanced lead and account search filters, personalized lead recommendations, CRM integrations, and real-time activity alerts. LinkedIn Premium, on the other hand, focuses more on general networking and job search features, such as seeing who viewed your profile and sending InMails.
Can I integrate LinkedIn Sales Navigator with my CRM?
Yes. Sales Navigator integrates with popular CRMs like Pipedrive, Salesforce, HubSpot, and Microsoft Dynamics. These integrations let you sync saved leads and accounts, log LinkedIn activity directly in your CRM, and see LinkedIn insights right inside your CRM dashboard. This makes it easier to track engagement and keep outreach efforts aligned across your team.
Is LinkedIn Sales Navigator worth it for solo founders or small teams?
If you have a well-defined Ideal Customer Profile (ICP) and you're relying on outbound for growth, Sales Navigator can be extremely valuable, even for a team of one. It saves time, improves targeting, and allows for more personalized outreach. Many early-stage founders and consultants use it as part of their lean ABM strategy to consistently build a quality pipeline.
How do I measure success with LinkedIn Sales Navigator?
Key metrics to track include reply rates to InMails or connection requests, meetings booked, conversion rate from lead to opportunity, and revenue generated from Sales Navigator-sourced deals. Over time, you’ll also want to look at how efficiently you're building lists and progressing leads through your funnel.
What are “Spotlights” in LinkedIn Sales Navigator, and why do they matter?
Spotlights are dynamic filters that highlight leads more likely to engage with you, like those who have posted recently, changed jobs, or follow your company. These real-time signals help prioritize outreach, making your messages feel more timely and relevant. Using Spotlights increases the chances of getting responses and starting meaningful conversations.
Can I automate outreach using LinkedIn Sales Navigator?
Sales Navigator itself doesn’t support bulk messaging or native automation to avoid spammy behavior. However, you can use tools like Zapier, PhantomBuster, or Lemlist to connect Sales Navigator with outreach workflows while staying within LinkedIn’s terms of service. Just remember, personalization is key. Automation should enhance, not replace, a thoughtful approach.
LinkedIn Sales Navigator: How to Generate Leads in 2025
LinkedIn Sales Navigator is one of the most effective tools for B2B lead generation, but it works only when combined with clear positioning and focused targeting. With features like advanced search, Spotlights, and account lists, it helps you find high-fit prospects and start meaningful conversations.
This guide explains how operators use Sales Navigator to build precise prospect lists, act on real-time signals, personalize outreach, and create a consistent system for predictable pipeline growth. When used strategically, the tool becomes a reliable engine for qualified leads and closed deals.


Insights Hub
.avif)
How to Cancel Your LinkedIn Premium Subscription?
.avif)
6 Proven Tips to Increase LinkedIn Connections in 2025